Festive Crochet Mistletoe Sprig Bouquet
Affiliate disclosure: This post may contain affiliate links. I may earn a small commission at no extra cost to you. See our Privacy Policy for details HERE.
- What Is a Mistletoe Bouquet?
- Why This Is a Great Choice for a Crochet Bouquet
- Before You Start
- Yarn and Hook Recommendations
- Materials
- Festive Crochet Mistletoe Sprig Bouquet Instructions
- Tips for Mistletoe Bouquet Success
- Common Mistakes to Avoid
- Ways to Make It Your Own
- Care and Washing Instructions
- Frequently Asked Questions
- More Ideas to Try
- Conclusion
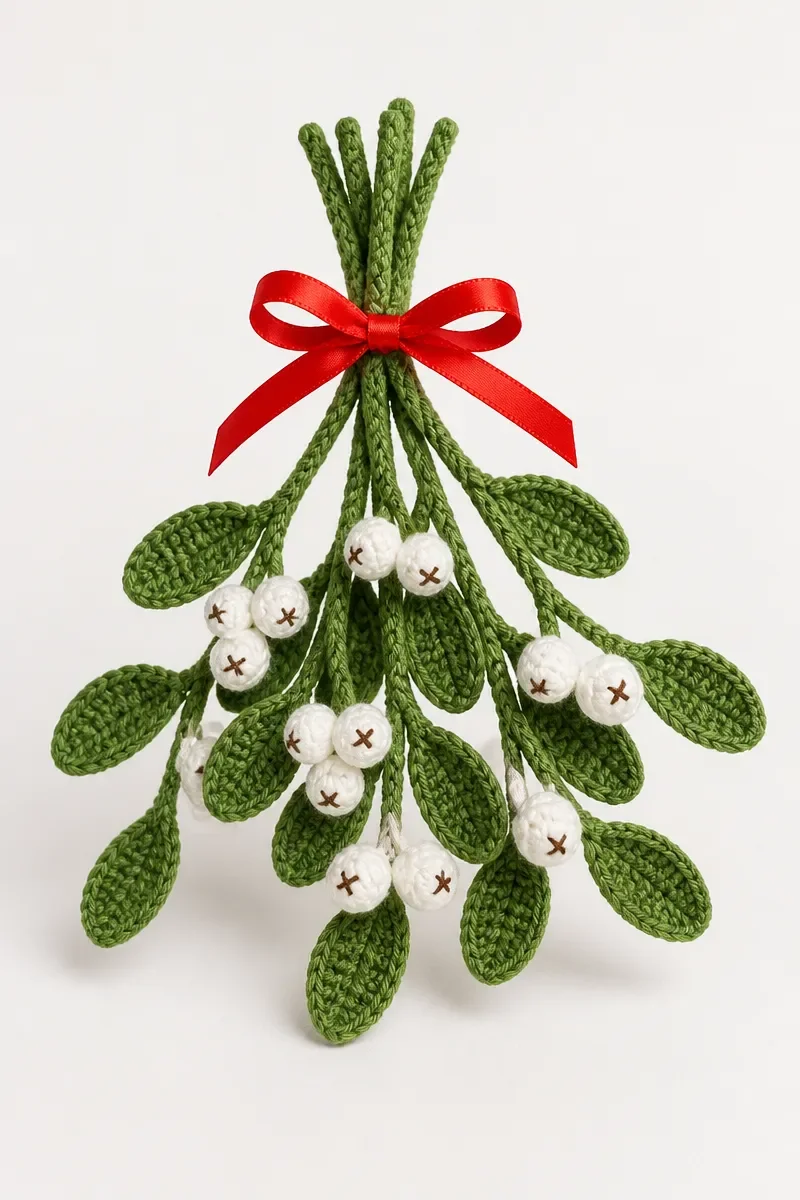
The Festive Crochet Mistletoe Sprig Bouquet is a decorative crochet project for a handmade seasonal accent. Its small-scale format makes it suitable for a relaxed crafting session, whether you are making one keepsake or preparing several for sharing.
This project may appeal to crocheters who enjoy creating thoughtful decorations and personal gifts. The finished bouquet can brighten a home during the festive season, become part of a gift presentation, or offer a handmade touch for someone who appreciates crochet.
Working on the bouquet gives you a chance to practice patience, pay attention to detail, and enjoy the steady rhythm of making. It also offers a useful way to build confidence with small crochet work and create a present that carries the care of your own hands.
What Is a Mistletoe Bouquet?
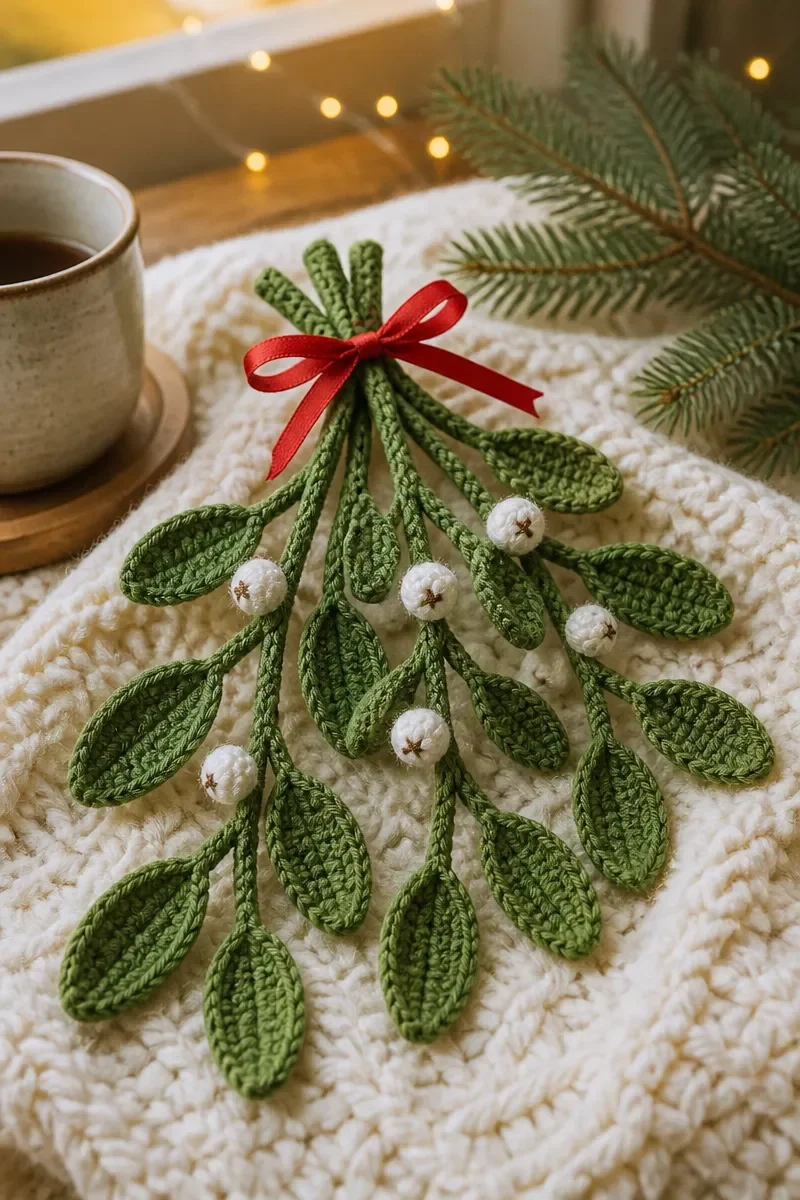
A mistletoe bouquet is a small decorative arrangement made from crocheted botanical motifs gathered together as a display. Like other handmade arrangements, it can bring a seasonal feeling to a room without relying on fresh plants, and its soft textile character gives it a welcoming look.
Crocheted botanical decorations are generally lightweight and flexible. They can be arranged on a shelf, displayed with other seasonal accents, or included in a thoughtful gift. Their handmade nature means that small differences in shape and placement can give each piece its own character.
Crocheters often enjoy this project type because it combines creative making with a clear decorative purpose. It suits a range of experience levels when worked at a comfortable pace, and it can be adapted through careful presentation. A finished arrangement can also become a keepsake that returns to a home each festive season.
Why This Is a Great Choice for a Crochet Bouquet
-
Decorative appeal: Handmade botanical arrangements add a personal touch to seasonal displays. Their crafted texture can sit comfortably beside other home decorations without needing a large space.
-
Gift potential: A crocheted arrangement can make a considerate present for someone who enjoys handmade objects. It is also a fitting choice when you want a gift with a personal story.
-
Flexible making: Each motif is worked as an individual piece, so you can build the project gradually. This can make it easier to pause between parts and return with a fresh eye.
-
Creative presentation: The finished arrangement can be styled to suit a shelf, a small table, or a gift display. A little attention to placement helps it feel complete and intentional.
-
Confidence building: Small decorative crochet projects offer a manageable way to practice careful work. Repeating familiar movements can help you settle into a steady, comfortable rhythm.
Before You Start
-
Make a gauge swatch when the finished dimensions matter to you. It gives you a chance to see how your yarn and hook behave together before you begin the full project.
-
Read through the entire project before picking up your hook. A clear sense of its sequence helps you prepare materials and understand where you may want to pause.
-
Keep a notebook or tally sheet close by for recording progress. Brief notes can help you return to your place after a break without relying on memory.
-
Organize and wind your yarn before you begin. Keeping skeins untangled and within reach makes it easier to focus on your work and avoid interruptions.
Yarn and Hook Recommendations
-
Fiber: Cotton can produce a defined fabric, while acrylic is often soft and easy to care for. Choose a fiber that feels comfortable in your hands and suits the intended display.
-
Yarn weight: DK yarn is a useful middle-weight option for small decorative work. It can provide enough structure to hold a shape without making delicate crochet feel bulky.
-
Smoothness: Smooth yarn makes individual loops easier to see and work into. This can be especially helpful when you are learning a new technique or want to keep your work consistent.
-
Texture: Textured yarn can add visual interest, but fuzzy fibers may make loops harder to identify. If you choose a fluffy yarn, take extra care to see where the hook enters.
-
Color visibility: Strong contrast between the yarn and your working surface helps you see the loops clearly. Good visibility can reduce eye strain and make counting more dependable.
-
Hook size: Match your hook to the yarn and the fabric you want to create. A smaller hook usually makes firmer work, while a larger one can leave a more open fabric.
Materials
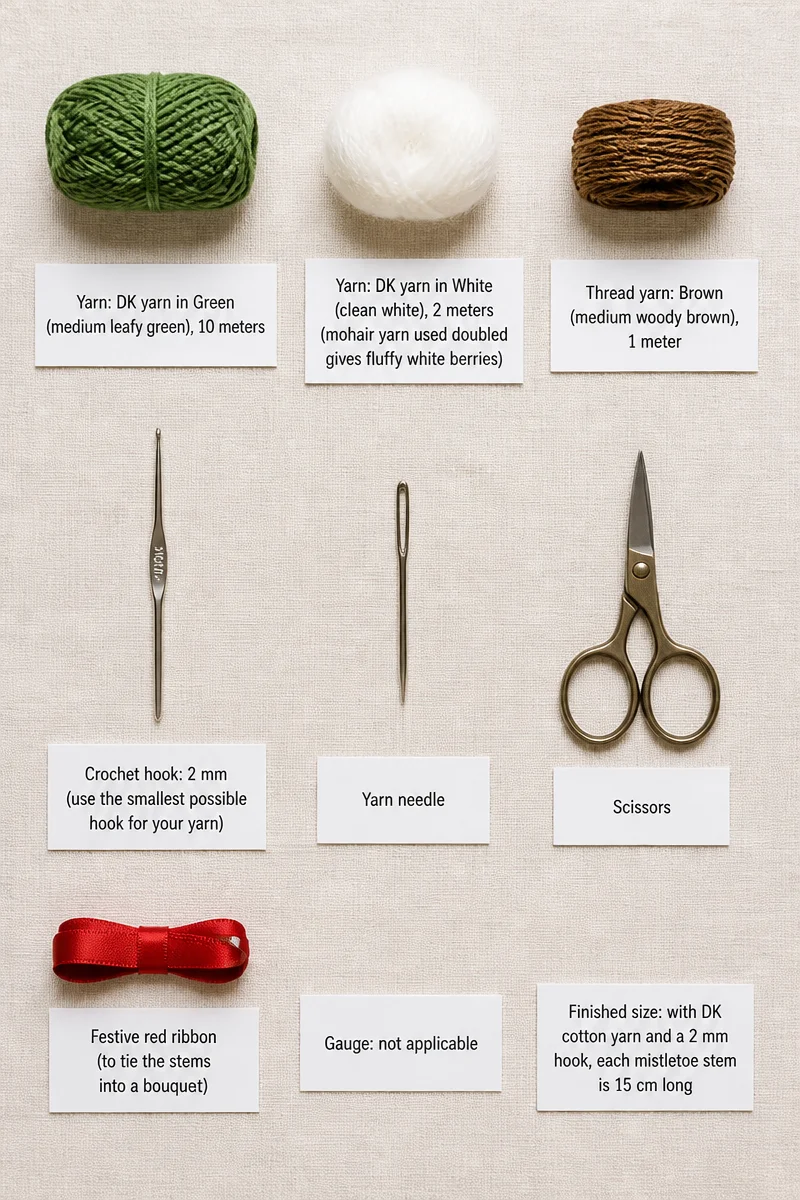
- Yarn: DK yarn in Green (medium leafy green), 10 meters
- Yarn: DK yarn in White (clean white), 2 meters (mohair yarn used doubled gives fluffy white berries)
- Thread yarn: Brown (medium woody brown), 1 meter
- Crochet hook: 2 mm (use the smallest possible hook for your yarn)
- Yarn needle
- Scissors
- Festive red ribbon (to tie the stems into a bouquet)
- Gauge: not applicable
- Finished size: with DK cotton yarn and a 2 mm hook, each mistletoe stem is 15 cm long
Festive Crochet Mistletoe Sprig Bouquet Instructions
Color key: Green = medium leafy green; White = clean white; Brown = medium woody brown.
-
Abbreviations: ch = chain; sl st = slip stitch; sc = single crochet; hdc = half double crochet; dc = double crochet; tr = treble crochet; inc = increase; dec = decrease; st(s) = stitch(es).
-
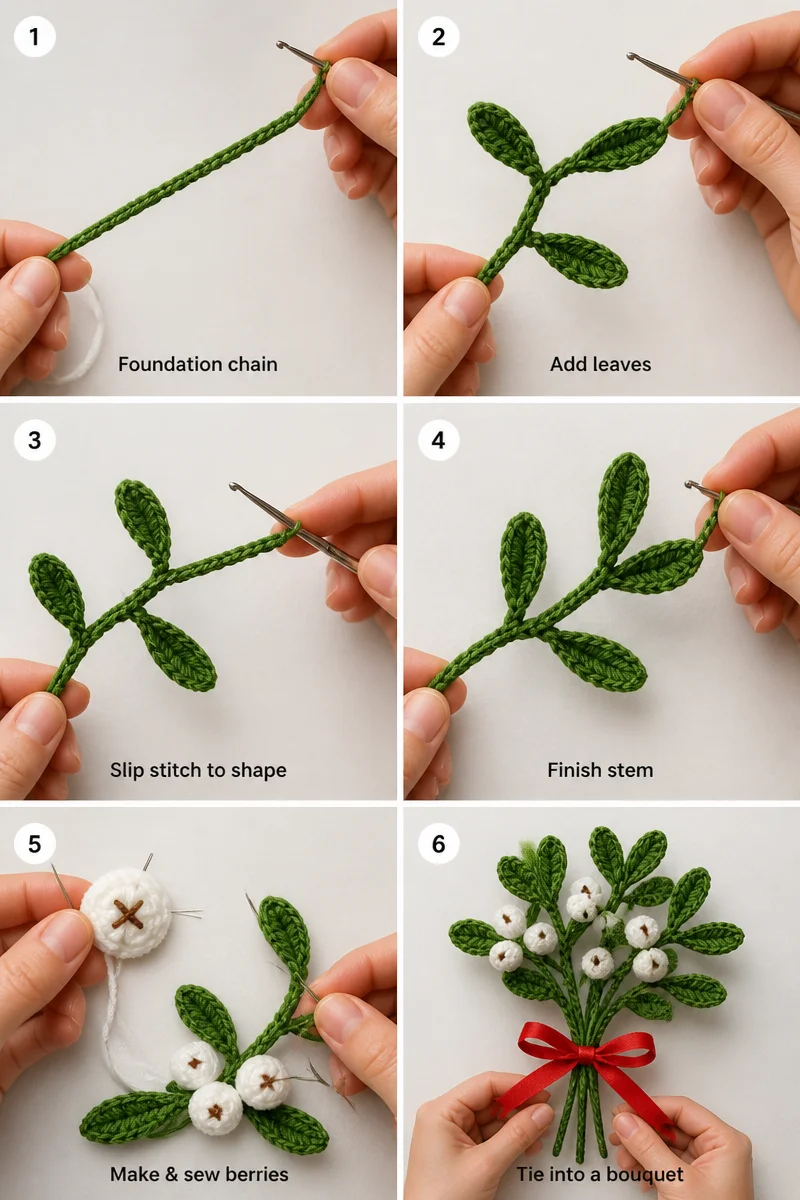
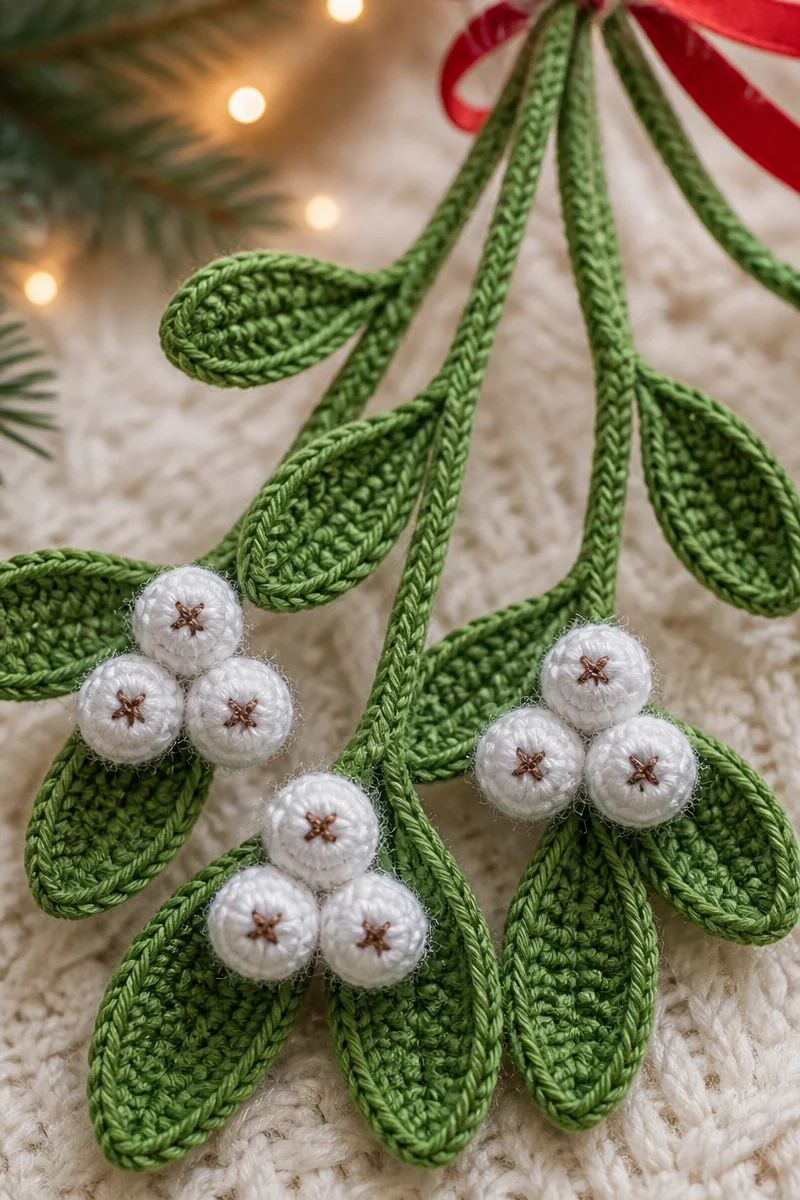
Notes: Each stem is made as an individual motif. The berries are made in a spiral separately and then sewn onto the mistletoe.
-
Notes: Make as many stems as you like, in both sizes.
Medium stem (Green yarn)
-
Step 1: Ch 33, tr in the 5th ch from the hook, tr, 3 dc, 3 hdc, 3 sc (the first leaf is made).
-
Step 2: Ch 15, tr in the 5th ch from the hook, tr, 3 dc, 3 hdc, 3 sc (the second leaf is made).
-
Step 3: Sl st in the next 8 sts.
-
Step 4: Ch 23, tr in the 5th ch from the hook, tr, 3 dc, 3 hdc, 3 sc (the third leaf is made).
-
Step 5: Ch 15, tr in the 5th ch from the hook, tr, 3 dc, 3 hdc, 3 sc (the final leaf is made).
-
Step 6: Sl st in the next 18 sts. Fasten off and weave in the ends.
Large stem (Green yarn)
-
Step 1: Ch 42, tr in the 5th ch from the hook, tr, 3 dc, 3 hdc, 3 sc.
-
Step 2: Ch 15, tr in the 5th ch from the hook, tr, 3 dc, 3 hdc, 3 sc.
-
Step 3: Sl st in the next 12 sts.
-
Step 4: Ch 27, tr in the 5th ch from the hook, tr, 3 dc, 3 hdc, 3 sc.
-
Step 5: Ch 15, tr in the 5th ch from the hook, tr, 3 dc, 3 hdc, 3 sc.
-
Step 6: Sl st in the next 27 sts. Fasten off and weave in the ends.
Berries (White yarn)
-
Row 1: Make a magic circle, ch 1, 6 sc. Pull the tail of the magic circle to close. (6 sc)
-
Row 2: 2 sc in each st (sc inc in each st). (12 sc)
-
Row 3: 1 sc in each st. (12 sc)
-
Row 4: Sc dec 6 times, working in the front loops only. (6 sc) Fasten off, leaving a long tail of 20 cm. Thread the tail on a tapestry needle and weave it in and out of the final 6 sts to close the berry.
-
Thread the Brown yarn on a needle and sew a cross on the base of the berry. Fasten off and weave in the ends.
-
Sew the berry onto the mistletoe in your desired position. Fasten off and weave in the ends.
Assembly
- Block each stem, then tie the stems together into a small bouquet with a festive red ribbon.
Tips for Mistletoe Bouquet Success
Comfortable posture
Choose a chair that supports your back, and let your shoulders rest rather than hunching over your work. Keep your elbows relaxed and bring the crochet close enough to see without bending your neck for long periods.
Use good lighting from a position that does not cast a shadow over your hands. If your eyes feel tired, pause and look away for a moment before returning to the work.
Steady tension
Aim for a relaxed, repeatable way of holding the yarn. If your fingers grip too tightly, the yarn may not glide smoothly and your hands can become uncomfortable during a longer crafting session.
Try to let the yarn feed at a consistent pace rather than pulling it sharply after each movement. A calm grip helps the finished fabric feel more uniform and makes it easier to insert the hook.
Track your place
Keep a tally sheet nearby and mark progress as you complete a section. A pencil mark or short written note can be more dependable than trying to remember where you stopped.
When you set the work aside, note any detail that will help you restart, such as the last completed action. This small habit is especially useful when several separate pieces are being made.
Check as you work
Pause at natural stopping points to look over the fabric. Notice whether the edges lie as expected and whether the surface feels consistent, rather than waiting until the whole piece is complete.
If you spot an issue, identify where it began before deciding what to do. Correcting a small mistake early can be less frustrating than adjusting several later sections to accommodate it.
Common Mistakes to Avoid
Skipping the swatch
A swatch can reveal how your chosen yarn and hook interact before you invest time in a larger piece. Without one, the fabric may turn out firmer, looser, or differently sized than you anticipated.
Make a small sample using the same materials and working habits you intend to use. Measure it without stretching, and compare the result with the dimensions you hope to achieve.
Pulling yarn too tight
Tight tension often comes from gripping the yarn or hook with more force than needed. This can make it difficult to insert the hook and may leave the fabric stiff or uneven.
Pause to relax your hands, then let the yarn move freely through your fingers. If the hook catches repeatedly, loosen your grip rather than forcing it through the loops.
Miscounting stitches
It is easy to lose track when working while distracted or when several similar sections are close together. A missed stitch can change the shape or make later counting confusing.
Count at regular intervals and use a written tally to record completed work. If your total seems wrong, recount slowly from a clear starting point instead of guessing where the error occurred.
Leaving ends too short
Short yarn tails can be difficult to secure neatly, especially when a piece will be handled or displayed. Cutting close before weaving in the end can also let it loosen over time.
Leave enough yarn for comfortable finishing, then use a yarn needle to weave the tail through nearby stitches. Avoid pulling so hard that the fabric gathers or changes shape.
Changing yarn or hook midway
Switching materials partway through can change how the fabric looks and feels. Differences in yarn thickness, texture, or hook size may make one section noticeably tighter or looser than another.
If you need to replace a material, compare it with the original before continuing. A small test sample can help you decide whether the new combination behaves consistently enough for the remaining work.
Ways to Make It Your Own
-
Try a different color palette that suits your home or the person receiving the gift. A coordinated combination can give the finished arrangement a distinct mood.
-
Choose another yarn in the same weight if you want a different feel or surface. Consider how its texture and care needs fit the way you plan to display it.
-
Make a matching second project to create a coordinated set. Similar handmade pieces can be displayed together or offered as separate gifts for friends or family.
-
Give the finished work with a handwritten note explaining why you chose it. A few personal words can make a handmade present feel especially thoughtful.
-
Present it in a small gift box or reusable wrapping. A neat presentation can protect the work and give the recipient a pleasant first impression.
Care and Washing Instructions
Washing: Follow the yarn label for washing advice, since care needs vary by fiber. If washing is suitable, handle the crochet gently and avoid rough rubbing that could distort the fabric.
Drying: Remove excess water without wringing or twisting the work. Lay it flat on a clean surface and let it air dry fully before storing or displaying it.
Blocking: Gentle blocking can help the flat crocheted fabric settle into a neater shape. Use a light touch and a method appropriate for the yarn, then allow the piece to dry completely.
Frequently Asked Questions
Can I use a different yarn?
Yes, you can use another yarn if it suits the kind of decorative work you want to make. Remember that changing fiber or texture may affect the fabric’s appearance. Test a small sample first so you can judge its feel and structure.
How can I keep my work even?
Use a comfortable grip and let the yarn move smoothly rather than tightening it after every movement. Check the fabric periodically for areas that look noticeably tighter or looser. If your hands become tense, pause and relax before continuing.
How do I count reliably?
Count at regular intervals and record your progress on a tally sheet or in a notebook. Use the same starting point each time so your count is easy to verify. If you lose track, recount patiently instead of estimating.
What if it looks different than expected?
Small variations are a normal part of handmade crochet, and they do not always mean something has gone wrong. Compare the fabric with your sample and consider whether tension or yarn texture explains the difference. Adjust only when the result affects the overall shape.
How long should I leave yarn tails?
Leave tails long enough to thread comfortably through a yarn needle and weave securely into the fabric. The needed length can vary depending on the task and yarn thickness. It is generally easier to trim extra after securing than to manage a tail that is too short.
More Ideas to Try
If you enjoy making handmade seasonal decorations, consider trying a crocheted wreath, a small ornament, a festive garland, or a decorative table accent. These projects can bring a coordinated feel to a home display and offer fresh ways to explore crochet. You can also choose an idea that uses yarn already in your craft supplies.
Conclusion
Set aside a comfortable place to work and enjoy making your Festive Crochet Mistletoe Sprig Bouquet at your own pace. The care you put into a handmade project can make it a meaningful decoration or gift. When you are ready for another creative idea, explore more crochet projects on the blog.